Candidate management
This chapter covers the entire life cycle of a candidate on the Tosa platform: adding candidates individually or in bulk, registering them to tests, sending them invitations and organizing your population into groups.
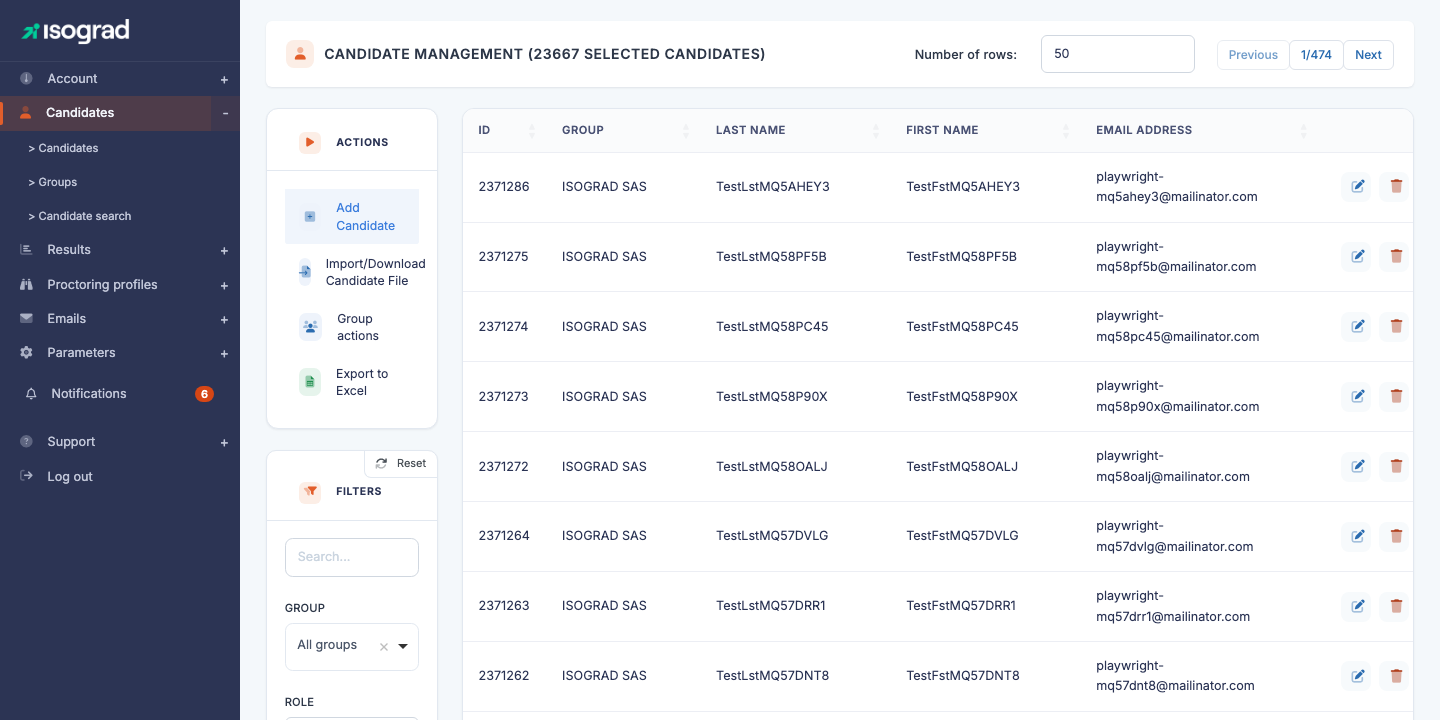
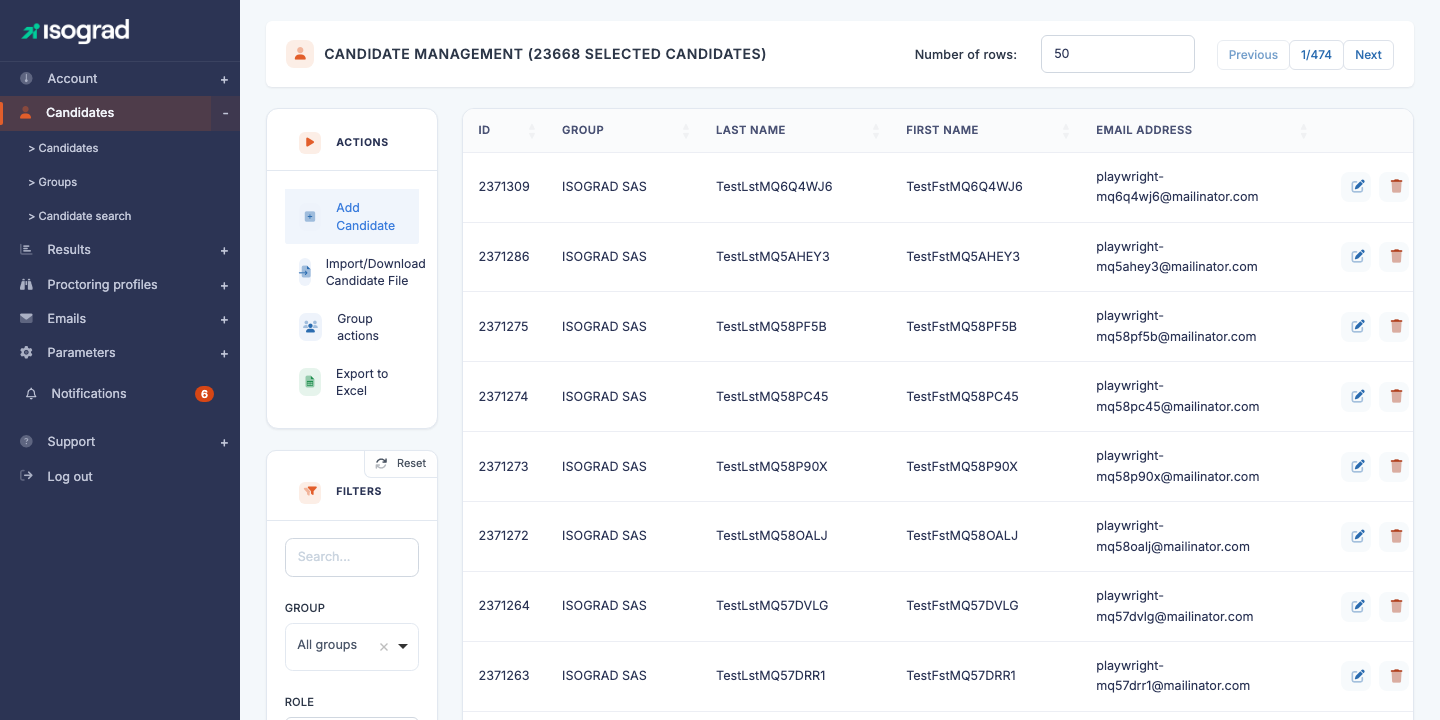
The Candidate management page is presented as a table listing all your candidates. The filters at the top of the page let you narrow the display (free-text search, membership in a group, candidates having a test to take, inclusion of archived candidates). The main actions — add a candidate, import a file, access group management — are located in the action bar at the top of the table.
Add a candidate
This procedure allows you to create a candidate individually. To add several candidates in a single operation, refer to the Import candidates section.
Procedure
-
From the Candidate management page, locate the Add a candidate button in the action bar at the top of the table.
-
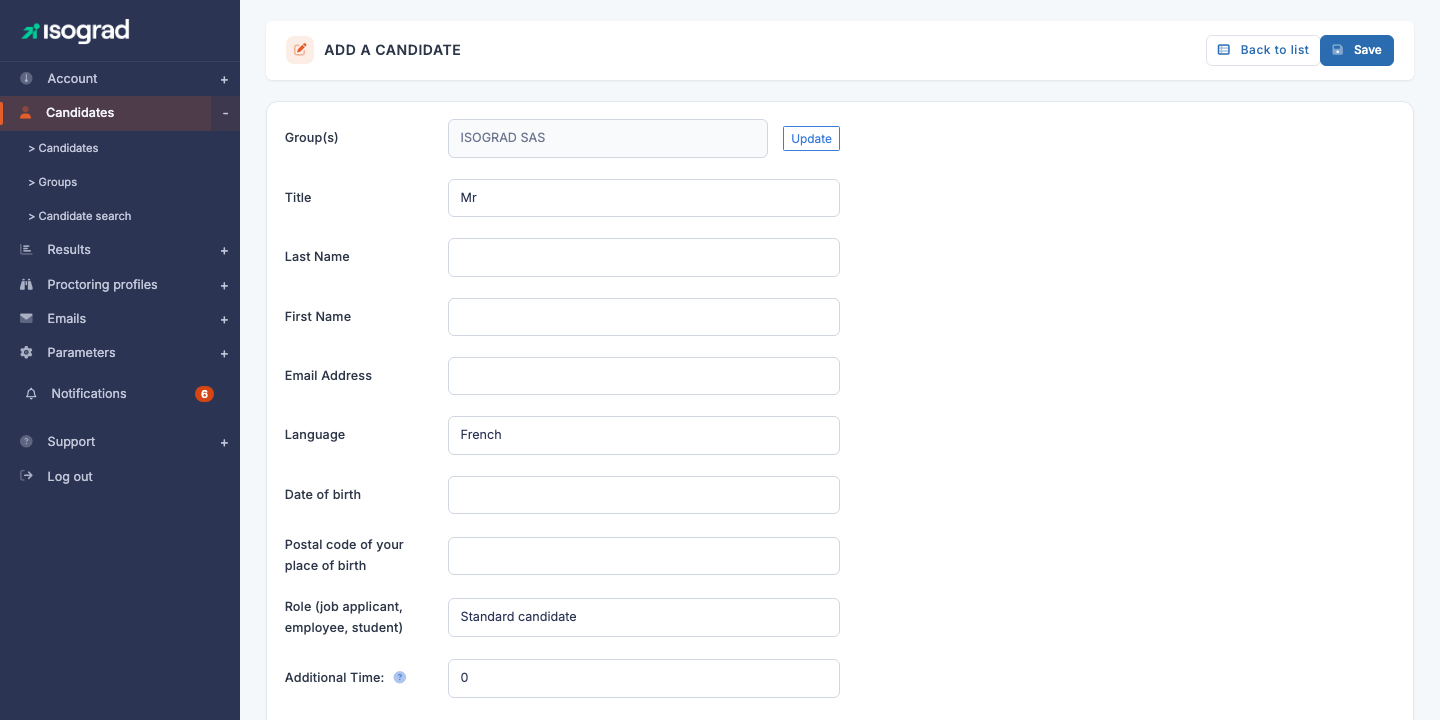
Click Add a candidate. The entry form opens.
-
Fill in the required fields:
- First name — first name of the candidate as it will appear on the certificates.
- Last name — last name of the candidate.
- Email — address at which the candidate will receive their invitations and access their workspace.
- Country — used to adapt the default language of the emails.
-
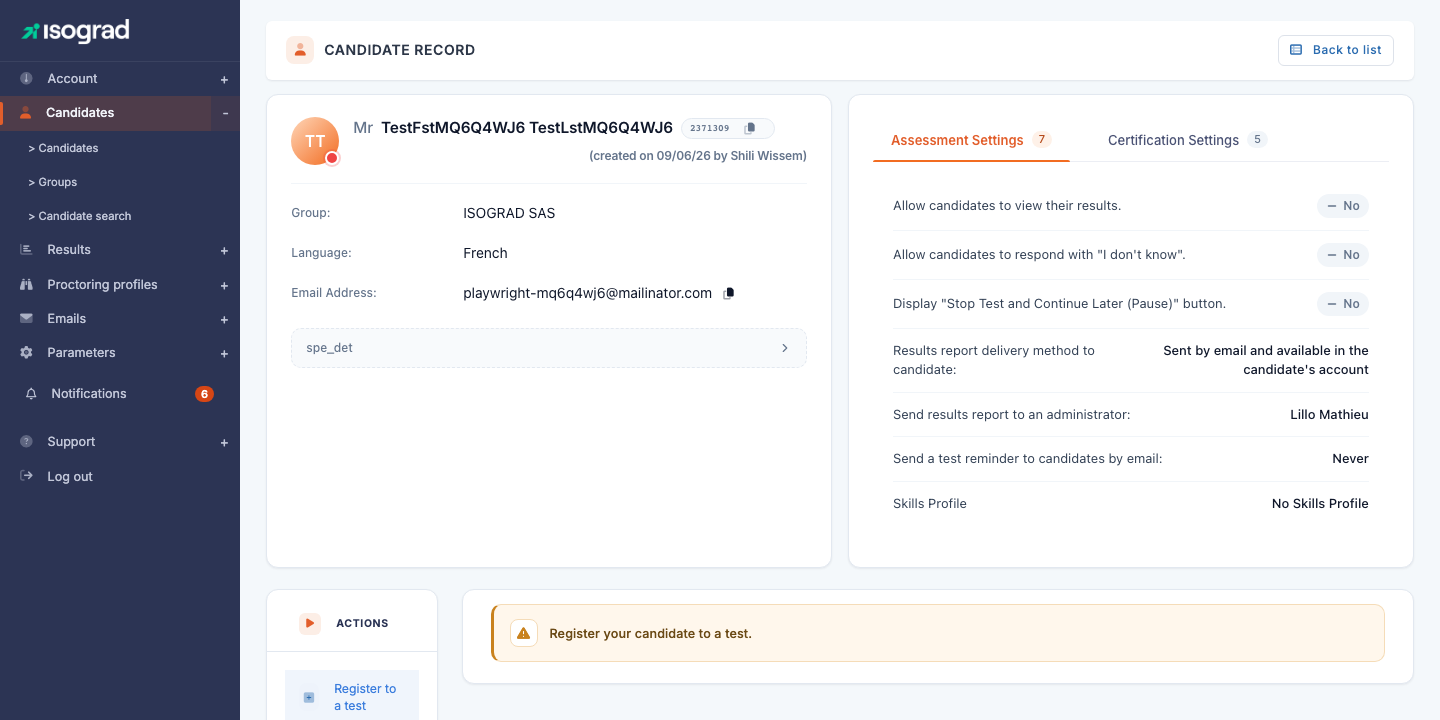
Click Save. The candidate is created and you are automatically redirected to their test registration page.
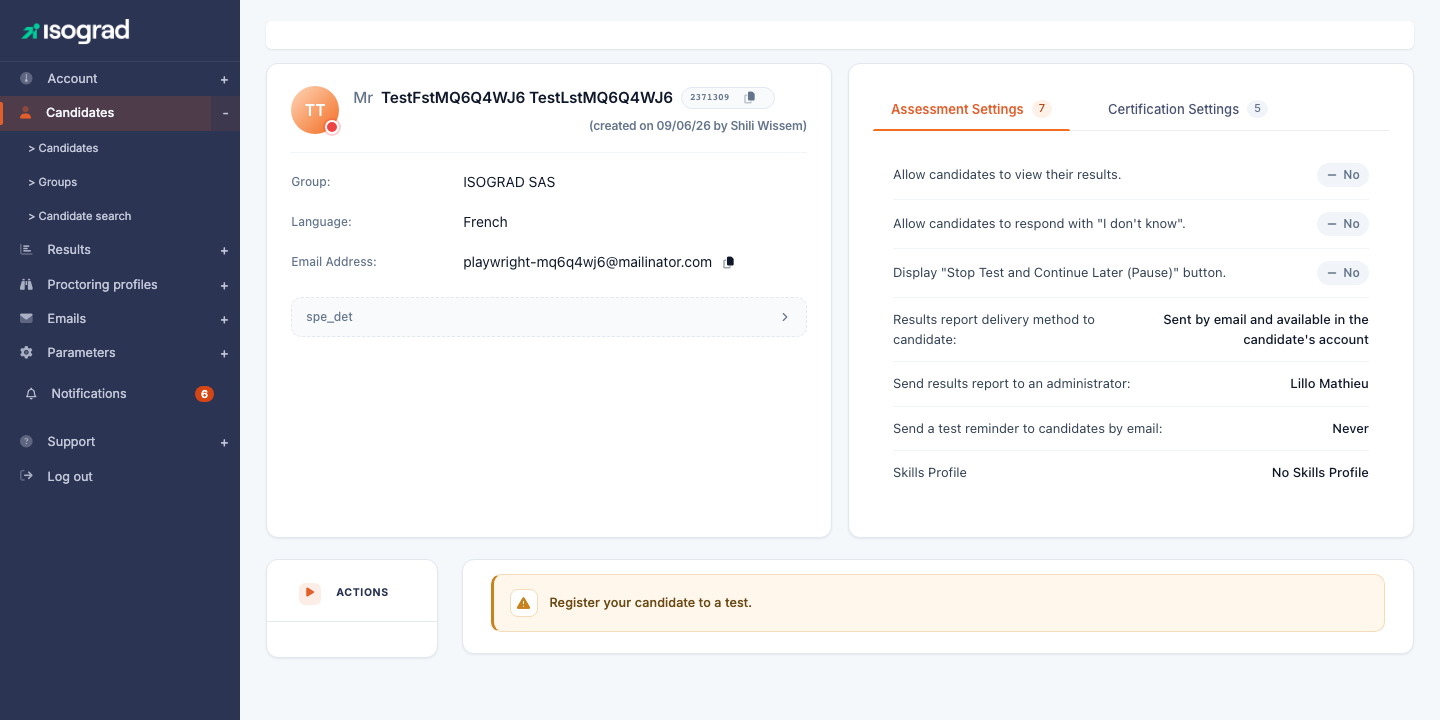
From this page, you can immediately register the candidate to a test or send them an invitation.
💡 Subsequent modification — To modify the contact details of an existing candidate, go back to the candidate list, click the Edit icon at the end of the row, then the Candidate details tab.
Import candidates
The candidate import allows you to create several candidates — or even pre-register them to tests — in a single operation, from an Excel file.
Procedure
-
From the Candidate management page, locate the Import/Download Candidate File button in the action bar.
-
Before preparing your file, download the file template from the link provided. The template contains the expected headers and an example row.
-
Fill in the template with your candidates. The main columns:
Column Required Description First name Yes Candidate’s first name. Last name Yes Candidate’s last name. Email Yes A unique email address per candidate. Country No Country code (FR, BE, …) for the default language. Group No Name of a group to attach the candidate to. Created automatically if it does not exist. Test No Name of the subject to register the candidate to directly at import time. -
Click Import/Download Candidate File, select your file, and confirm.
-
The platform displays an import report: number of candidates created, updated, or rejected (with the rejection reason row by row).
⚠️ Duplicate emails — If a candidate already exists with the same email address, their information is updated rather than recreated. A new record is never created for an existing address.
💡 Import and invitations — The import does not automatically trigger the sending of invitations. To send the login emails after import, refer to the Send invitations section.
Register a candidate to a test
Once the candidate is created, you must register them to one or more tests so they can take them.
Register a candidate from their record
-
From the candidate list, click the Edit icon of the corresponding row. You arrive on the candidate’s test registration page.
-
Click Add a test.

-
In the window that opens, choose the subject (topic) to evaluate, then configure the registration:
- Test type — evaluation, certification, etc., depending on the packs available on your account.
- Language — language in which the test will be presented to the candidate.
- Deadline (optional) — beyond this date, the candidate will no longer be able to start the test.
- Proctoring (optional) — enables the proctored session if your account has this option.
-
Confirm. The test appears immediately in the candidate’s registration table.
Register several candidates at the same time
To register several candidates to the same test, use the group action:
- On the Candidate management page, select the candidates to register by ticking the check box at the start of the row.
- In the group actions menu, choose Register candidates to a test.
- Fill in the test parameters; they apply to the entire selection.
💡 Credits — Each registration consumes one credit from the corresponding pack. The remaining balance is visible at the top of the page. To buy back credits, contact your Isograd representative.
Send invitations
Sending the email invitation transmits the candidate’s personalized login link. This is the step that makes the test accessible on the candidate’s side.
Send an invitation to a single candidate
-
Open the candidate’s record (from the list, click the Edit icon).
-
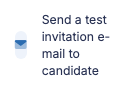
Click Send registration email (or the equivalent button visible in the record).
-
A window allows you to:
- Choose the email template (language, tone, signature) among those configured for your account.
- Preview the content that will be sent.
- Customize the subject or body if necessary, before sending.
-
Click Send. The candidate immediately receives their email containing the login link.
Send invitations in bulk
From the Candidate management page:
- Select the candidates to invite (check box at the start of the row).
- In the group actions menu, choose Send registration emails.
- Choose the email template and confirm.
All the selected candidates receive the invitation with their personal link.
⚠️ Invalid addresses — If a candidate’s email address is invalid or refused by the destination server, you will see it in the send report. Correct the address on the candidate’s record then resend.
💡 Customize email templates — Email templates are managed in the Email management chapter (forthcoming). You can create variants there by language, by brand, or by test type.
Manage groups
Groups let you organize your candidate population (by class, department, client, training course, etc.) to make bulk actions easier: registrations, invitations, result tracking.
Access the groups
From the navigation menu, click Groups (or access the URL /clientadmin/candidates/AdminGroupsWithTable).
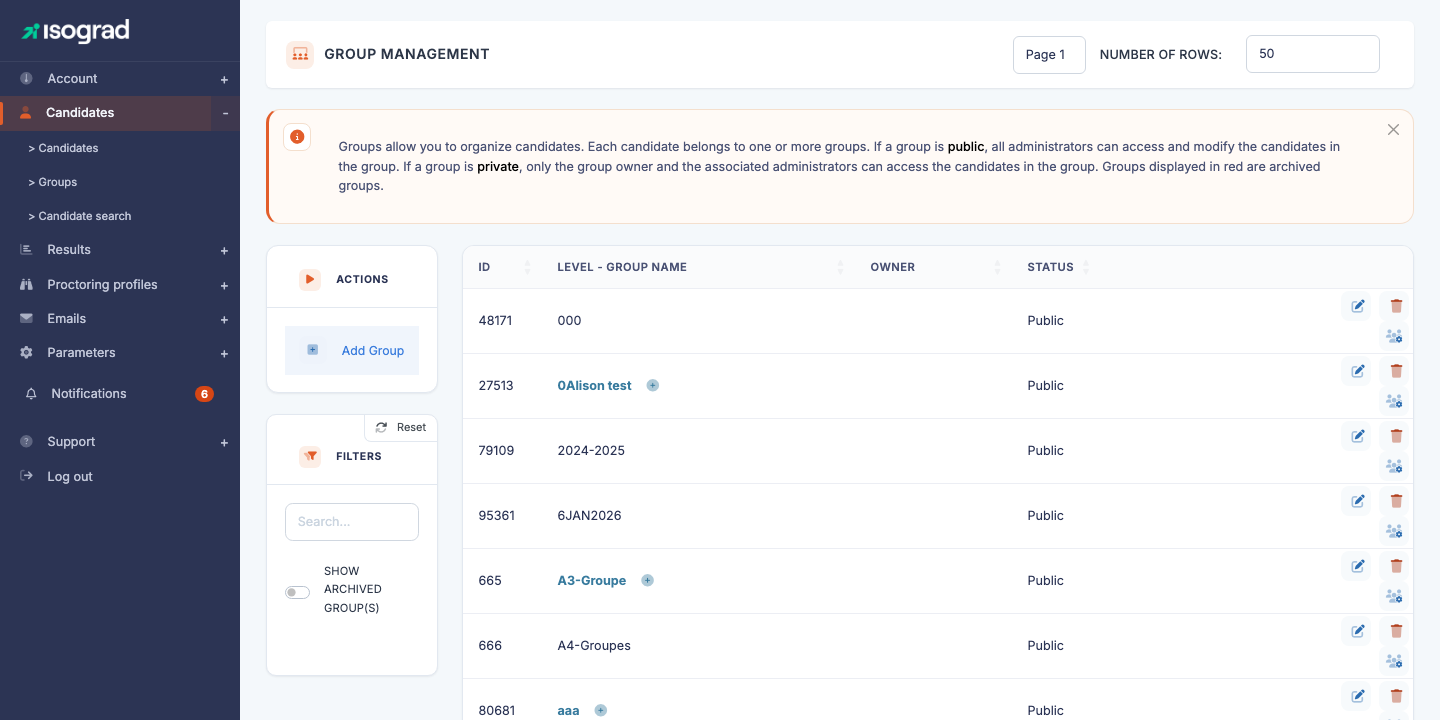
The Group management page displays all your groups in a hierarchical form. A group can contain sub-groups — useful for example to structure “Promotion 2026 → Section A → Evening class”.
Create a group
- Click Add a group in the action bar.
-
Fill in:
- Name of the group.
- Parent group (optional) — to create a hierarchy.
- Color or tag (depending on your version) — to visually identify the group.
- Confirm.
Add a candidate to a group
Two methods:
- From the candidate’s record: open the record, Groups tab, add the candidate to the desired groups.
- Group action on the candidate list: select the candidates, then Add to a group.
Group actions
Once your candidates are organized into groups, the Group filter on the Candidate management page lets you isolate a population and apply a bulk action to it:
- Register the whole group to a test.
- Send an invitation to the whole group.
- Set a common password.
- Assign the group to a proctored session.
- Archive the group (the candidates remain in the database but are hidden by default).
- Delete the registered tests, or delete the candidates from the group.
💡 Archiving vs deletion — Archiving is non-destructive: it hides the group and its candidates from the lists by default, but preserves the history of past tests. Deletion is final — use it only for candidates created in error.